RequireJS, TypeScript and Knockout Components

Despite the teething problems I had getting my head around RequireJS, I had another go this week on sorting this out. The motivation for this was Knockout Components – re-usable asynchronous web components that work with Knockout. So this article details the steps required to make this work on a vanilla ASP.NET MVC website.

Components

If you’re not familiar with components, they are similar to ASP.NET Web Controls – re-usable, modular components that are loosely coupled – but all using client-side JS and HTML.

Although you can use and implement components without an asynchronous module loader, it makes much more sense to do so and to modularise your code and templates. This means you can specify the JS code and or HTML template is only loaded at runtime, asynchronously, and on-demand.

Demo Project

To show how to apply this to a project, I’ve created a GitHub repository with a web app. Step one was to create the ASP.NET MVC application. I used .NET 4.5 and MVC version 5 for this but older versions would work just as well.

Next I upgraded all the default Nuget packages including JQuery so that we have the latest code, and then amended the home page to remove the standard ASP.NET project home page. So far, nothing new.

RequireJS

Next step is to add RequireJS support. At present our app loads the JavaScript modules synchronously from the HTML pages, using the ASP.NET bundler.

        public static void RegisterBundles(BundleCollection bundles)
        {
            bundles.Add(new ScriptBundle("~/bundles/jquery").Include(
                        "~/Scripts/jquery-{version}.js"));

These are inserted via the _Layout.cshtml template:

    @Scripts.Render("~/bundles/jquery")
    @Scripts.Render("~/bundles/bootstrap")
    @RenderSection("scripts", required: false)

First we add RequireJS to the web app from the Nuget project, and the Text Addon for RequireJS. This is required to allow us to load non-JavaScript items (e.g. CSS and HTML) using RequireJS. We’ll need that to load HTML templates. These will load into the /Scripts folder.

Configuring RequireJS

Next, we create a configuration script file for RequireJS. Mine looks like this, yours may be different depending on how your scripts are structured:

require.config({
    baseUrl: "/Scripts/",
    paths: {
        jquery: "jquery-2.1.1.min",
        bootstrap: "bootstrap.min"
    },
    shim: {
        "bootstrap": ["jquery"]
    }
});

This configuration uses the default Scripts folder, and maps the module ‘jquery’ to the version of JQuery we have updated to. We’ve also mapped ‘bootstrap’ to the minified version of the Bootstrap file, and added a shim that tells RequireJS that we need to load JQuery first if we use Bootstrap.

I created this file in /Scripts/require/config.ts  using TypeScript. At this point TypeScript is flagging an error saying that require is not defined. So now we need to add some TypeScript definition files. The best resource for these is the Github project Definitely Typed, and these are all on Nuget to make it even easier. We can do this from the Package Manager console:

   1: Install-Package jquery.TypeScript.DefinitelyTyped

   2: Install-Package bootstrap.TypeScript.DefinitelyTyped

   3: Install-Package requirejs.TypeScript.DefinitelyTyped

Implementing RequireJS

At this point we have added the scripts but not actually changed our application to use RequireJS. To do this, we open the _Layout.cshtml file, and change the script segment to read as follows:

    <script src="~/Scripts/require.js"></script>
    <script src="~/Scripts/require/config.js"></script>
    @* load JQuery and Bootstrap *@
    <script>
        require(["jquery", "bootstrap"]);
    </script>
    @RenderSection("scripts", required: false)

This segment loads require.js first, then runs the config.js file which configures RequireJS.

Important: Do not use the data-main attribute to load the configuration as I originally did –  you’ll find that you cannot guarantee that RequireJS is properly configured before the require([…]) method is called. If the page loads with errors, e.g. if the browser tries to load /Scripts/jquery.js or /Scripts/bootstrap.js then you’ve got it wrong.

Check the network load for 404 errors in the browser developer tools.

Adding Knockout

We add Knockout version 3.2 from the package manager along with the TypeScript definitions as follows:

install-package knockoutjs
Install-Package knockout.TypeScript.DefinitelyTyped

You need at least version 3.2 to get the Component support.

I then modified the configuration file to add a mapping for knockout:

require.config({ baseUrl: "/Scripts/", paths: { jquery: "jquery-2.1.1.min", bootstrap: "bootstrap.min", knockout: "knockout-3.2.0" }, shim: { "bootstrap": ["jquery"] } });

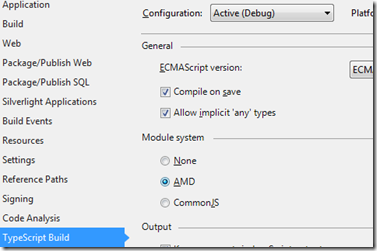
Our last change is to change the TypeScript compilation settings to create AMD output instead of the normal JavaScript they generate. We do this using the WebApp properties page:

image

This allows us to make us of require via the import and export keywords in our TypeScript code.

We are now ready to create some components!

Demo1 – Our First Component: ‘click-to-edit’

I am not going to explain how components work, as the Knockout website does an excellent job of this as do Steve Sanderson’s videos and Ryan Niemeyer’s blog.

Instead we will create a simple page with a view model with an editable first and last name. These are the steps we take:

  1. Add a new ActionMethod to the Home controller called Demo1
  2. Add a view with the same name
  3. Create a simple HTML form, and add a script section as follows:
    <p>This demonstrates a simple viewmodel bound with Knockout, and uses a Knockout component to handle editing of the values.</p>
    <form role="form">
        <label>First Name:</label>
        <input type="text" class="form-control" placeholder="" data-bind="value: FirstName" />
        @* echo the value to show databinding working *@
        <p class="help-block">
            Entered: {<span data-bind="text: FirstName"></span>}
        </p>
        <button data-bind="click: Submit">Submit</button>
    </form>
    
    @section scripts {
        <script>
            require(["views/Demo1"]);
        </script>
    }
  4. We then add a folder views to the Scripts folder, and create a Demo1.ts TypeScript file.
// we need knockout
import ko = require("knockout");

export class Demo1ViewModel {
    FirstName = ko.observable<string>();

    Submit() {
        var name = this.FirstName();
        if (name)
            alert("Hello " + this.FirstName());
        else
            alert("Please provide a name");
    }
}

ko.applyBindings(new Demo1ViewModel());

This is a simple viewmodel but demonstrates using RequireJS via an import statement. If you use a network log in the browser development tools, you’ll notice that the demo1.js script is loaded asynchronously after the page has finished loading.

So far so good, but now to add a component. We’ll create a click-to-edit component where we show a text observable as a label that the user has to click to be able to edit.

Click to Edit

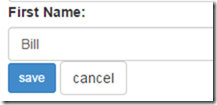
Our component will show the current value as a span control, but if the user clicks this, it changes to show an input box, with Save and Cancel buttons. If the user edits the value then clicks cancel, the changes are not saved.

image view mode and  image edit mode

To create this we’ll add three files in a components subfolder of Scripts:

  • click-to-edit.html – the template
  • click-to-edit.ts – the viewmodel
  • click-to-edit-register.ts – registers the component

The template and viewmodel should be simple enough if you’re familiar with knockout: we have a viewMode observable that is true if in view mode, and false if editing. Next we have value – an observable string that we will point back to the referenced value. We’ll also have a newValue observable that binds to the input box, so we only change value when the user clicks Save.

TypeScript note: I found that TypeScript helpfully removes ‘unused’ imports from the compiled code, so if you don’t use the resulting clickToEdit object in the code, it gets removed from the resulting JavaScript output. I added the line var tmp = clickToEdit; to force it to be included.

Registering and Using the Component

To use the component in our view, we need to register it, then we use it in the HTML.

Registering we can do via import clickToEdit = require(“click-to-edit-register”); at the top of our Demo1 view model script. The registration script is pretty short and looks like this:

import ko = require("knockout");

// register the component
ko.components.register("click-to-edit", {
    viewModel: { require: "components/click-to-edit" },
    template: { require: "text!components/click-to-edit.html" }
});

The .register() method has several different ways of being used. This version is the fully-modular version where the script and HTML templates are loaded via the module loader. Note that the viewmodel script has to return a function that is called by Knockout to create the viewmodel.

TypeScript note: the viewmodel code for the component defines a class, but to work with Knockout components the script has to return a function that is used to instantiate the viewmodel, in the same form as this script. To do this, I added a line  return ClickToEditViewModel; at the end of this module. This appears to return the class, which of course is actually a function that is the constructor. This function takes a params parameter that should have a value property that is the observable we want to edit.


Using the component is easy: we use the name that we used when it was registered (click-to-edit) as if it were a valid HTML tag.

<label>First Name:</label>
    <div class="form-group">
        <click-to-edit params="value: FirstName"></click-to-edit>
    </div>

We use the params attribute to pass the observable value through to the component. When the component changes the value, you will see this reflected in the page’s model.

Sequence of Events

It’s interesting to follow through what happens in sequence:

  1. We navigate to the web URL /Home/Demo1, which maps to the controller action Demo1
  2. The view is returned, which only references one script “views/Demo1” using require()
  3. RequireJS loads the Demo1.js script after the page has finished loading
  4. This script references knockout and click-to-edit-register, which are both loaded before the rest of the script executes
  5. The viewmodel binds using applyBindings(). Knockout looks for registered components and finds the <click-to-edit> tags in our view, so it makes requests to RequireJS to load the viewModel script and the HTML template.
  6. When both have been loaded, the find binding is completed.

It’s interesting to watch the network graph of the load:

image

The purple vertical line represents when the page finished loading, after about 170ms – about half way through the page being completed and ready. In this case I had cleared the cache so everything was loaded fresh. The initial page load only has just over 33KB of data, whereas the total loaded was 306KB. This really helps make sites more responsive on a first load.

Another feature of Knockout components is that they are dynamically loaded only when they are used. If I had a component used for items in an observable array, and the array was empty, then the components’ template and viewModel would not be used. This is really great if you’re creating Single Page Applications.

Re-using the Component

One of the biggest benefits of components is reuse. We can now extend our viewModel in the page to add a LastName property, and use the click-to-edit component in the form again:

    <label>First Name:</label>
    <div class="form-group">
        <click-to-edit params="value: FirstName"></click-to-edit>
    </div>
    <label>Last Name:</label>
    <div class="form-group">
        <click-to-edit params="value: LastName"></click-to-edit>
    </div>

Now the page has two values using the same control, independently bound.
RequireJS – Shooting Yourself in the Foot Made Simple

I’ve run across a few JavaScript dependency issues when creating pages, where you have to ensure the right libraries are loaded in the right order before the page-specific stuff is loaded.

RequireJS seems like the solution to this problem as you can define requirements in each JavaScript file. It uses the AMD pattern and TypeScript supports AMD, so it looked like the obvious choice.

I’ve tried looking at RequireJS before briefly. A quick look was enough to make me realise this wasn’t a simple implementation, so until this weekend I had not made a serious attempt to learn it. Having tried to do this over a weekend, I’ve begun to realise why it’s not more widely used.

Introduction

On the face of it, it seems that it should be simple. You load the require.js script and give it a config file in the data-main attribute, to set it up. When you write JavaScript code, you do so using AMD specifications so it can be loaded asynchronously and in the correct order.

For TypeScript users like myself, this presents a big barrier to entry (not RequireJS’s fault), as you need to specify the –module AMD flag on the compiler. This means all TypeScript code in the application is now compiled with AMD support, so existing non-requireJS pages won’t work. You have to migrate all in one go.

Setting Up a Test App

I created a simple ASP.NET web application with MVC to test requireJS, and followed the (many) tutorials, which explain how to configure the baseURL, paths etc. I then add a script tag to the _Layout.cshtml template to load and configure requireJS:

<script data-main="/Scripts/Config.js"

src="~/Scripts/require.js"></script>

Seems simple enough, doesn’t it? In fact I’d just shot myself in the foot: I just didn’t realise it.

Since my original layout loaded jQuery and Bootstrap, I needed to replicate that, so I added the following code:

    <script>
        require(['jquery', 'bootstrap'], function ($, bootstrap) {
        });
    </script>

This would tell requireJS to look for a javascript file called /Scripts/jquery.js, but since I loaded jQuery using Nuget the file is actually /Scripts/jquery-2.1.1.min.js

I obviously don’t want to bake that version number into every call or require() statement, so requireJS supports an ‘aliasing’ feature. In the config you can specify a path, in this format:

    paths: {
        "jquery": "jquery-2.1.1.min",
        "bootstrap": "bootstrap.min"
    }

Requesting the ‘jquery’ module should now actually ensure that jquery-2.1.1.min.js is loaded.

Except that it doesn’t… most of the time.

Loading the page on both IE and Chrome with developer tools, I can see that mostly that require.js is trying to load /Scripts/jquery.js – what gives‽ Changing the settings and trying different combinations seems to have bearing on what actually happens.

I felt like a kid who’d picked up the wrong remote control for his toy car: it didn’t matter what buttons I pressed, the car seemed to ignore me.

StackOverflow to the Rescue (again)

I don’t like going to StackOverflow too quickly. Often, even just writing the question prompts enough ideas to try other solutions and you find the answer yourself.

In this case I’d spent part of my weekend and two days, hunting through lots of tutorials and existing StackOverflow answers, trying to figure out WTF was going on. Finally a kind soul pointed me to the right solution:

A config/main file specified in the in the data-main attribute of the require.js script tag is loaded asynchronously.

To be fair, requireJS does try to make this reasonably clear here http://requirejs.org/docs/api.html#data-main – but this is just one little warning in the sea of information you are trying to learn.

This means that when you call require(…) you can’t be certain that the configuration is actually loaded or not. When I called require(..) just after the script tag for requireJS it had not been run, so it was using a default configuration.

What requireJS intended was that you load your modules just after setting the configuration, inside the config.js file. However, this approach only works if every page is running the same scripts.

So far the only way to get this to work has been to remove the data-main attribute and load Config.js as a separate script tag. At that point we can be sure the config has been applied and can specify dependencies and use aliases.

TypeScript files not compiling in VS2013 project

I created a C# class library project to hold some product-related code, and wanted to emit some JavaScript from this DLL, compiled from a TypeScript file. I added the .ts file and compiled the project, but no .js file was created.

The first thing to check is the Build Action is set to “TypeScriptCompile”, which it was – so why no .js output?

It seems the VS 2013 update 2 which is supposed to incorporate TypeScript compilation is not adding the required Import section to the project file.

If you add this line

  <Import Project="$(MSBuildExtensionsPath32)\Microsoft\VisualStudio\v$(VisualStudioVersion)\TypeScript\Microsoft.TypeScript.targets" />

Just after the line

  <Import Project="$(MSBuildToolsPath)\Microsoft.CSharp.targets" />

Then the TypeScript compiler will be invoked.

My thanks to my colleague Sri for figuring this one out!

Reported as a bug on Microsoft Connect: https://connect.microsoft.com/VisualStudio/feedback/details/934285/adding-typescript-files-to-vs-2013-update-2-library-does-not-compile-typescript

Using Google Drive API with C# – Part 2

Welcome to Part 2 which covers the authorization process. If you have not yet set up your Google API access, please read part 1 first.

OpenAuth

The OpenAuth initially seems pretty complicated, but once you get your head around it, it’s not that scary, honest!

If you followed the steps in Part 1 you should now have a Client ID and Client Secret, which are the ‘username’ and ‘password’. However, these by themselves are not going to get you access directly.

Hotel OpenAuth

You can think of OpenAuth of being a bit like a hotel, where the room is your Google Drive. To get access you need to check in at the hotel and obtain a key.

When you arrive at reception, they check your identity, and once they know who you are, they issue a card key and a PIN number to renew it. This hotel uses electronic card keys and for security reasons they stop working after an hour.

When the card stops working you have to get it re-enabled. There is a machine in the lobby where you can insert your card, enter the PIN and get the card renewed, so you don’t have to go back to the reception desk and ask for access again.

Back To OpenAuth

In OpenAuth ‘Reception’ is the authentication request that appears in the browser you get when you first attempt to use a Client ID and Client Secret. This happens when you call GoogleWebAuthorizationBroker.AuthorizeAsync the first time.

This allows the user to validate the access being requested from your application. If the access is approved, the client receives a TokenResponse object.

The OpenAuth ‘key card’ is called an AccessToken, and will work for an hour after being issued. It’s just a string property in the TokenResponse. This is what is used when you try to access files or resources on the API.

When the AccessToken expires you need to request a new one, and the ‘PIN number’ is a RefreshToken (another property in TokenResponse) which also got issued when the service validated you. You can save the refresh token and re-use it as many times as you need. It won’t work without the matching Client ID and Client Secret, but you should still keep it confidential.

With the .NET API this renewal process is automatic – you don’t need to request a new access key if you’ve provided a RefreshToken. If the access is revoked by the Drive’s owner, the RefreshToken will stop working, so you need to handle this situation when you attempt to gain access.

Token Storage

The first time you make a call to AuthorizeAsync will result in the web authorization screen popping up, but in subsequent requests this doesn’t happen, even if you restarted the application. How does this happen?

The Google .NET client API stores these access requests using an interface called IDataStore. This is an optional parameter in the AuthorizeAsync method, and if you didn’t provide one, a default FileDataStore (on Windows) would have been used. This stores the TokenResponse in a file in a folder [userfolders]\[yourname]\AppData\Roaming\Drive.Auth.Store

When you call AuthorizeAsync a second time, the OpenAuth API uses the key provided to see if there is already a TokenResponse available in the store.

Key, what key? The key is the third parameter of the AuthorizeAsync method, which in most code samples is just “user”.

   1: var credential = GoogleWebAuthorizationBroker.AuthorizeAsync(

   2:                 secrets,

   3:                 new string[] {DriveService.Scope.Drive}, 

   4:                 "user", 

   5:                 CancellationToken.None).Result;

It follows that if you run your drive API application on a different PC, or logged in as a different user, the folder is different and the stored TokenResponse isn’t accessible, so the user will get prompted to authorise again.

Creating Your Own IDataStore

Since Google uses an interface, you can create your own version of the IDataStore. For my application, I would only be using a single client ID and secret for the application, but I wanted it to work on the live server without popping up a web browser.

I’d already obtained a TokenResponse by calling the method without a store, and authorised the application in the browser. This generated the TokenResponse in the file system as I just described.

I copied the value of just the RefreshToken, and created a MemoryDataStore that stores the TokenResponses in memory, along with a key value to select them. Here’s the sequence of events:

  1. When my application starts and calls AuthorizeAsync the first time, I pass in MemoryDataStore.
  2. The Google API then calls the .GetAsync<T> method in my class, so I hand back a TokenResponse object where I’ve set only the ResponseToken property.
  3. This prompts the Google OAuth API to go and fetch an AccessToken (no user interaction required) that you can use to access the drive.
  4. Then the API calls StoreAsync<T> with the resulting response. I then replace the original token I created with the fully populated one.
  5. This means the API won’t keep making requests for AccessTokens for the next hour, as the next call to GetAsync<T> will return the last key (just like the FileStore does).

Note that the ResponseToken we get back has an ExpiresInSeconds value and an Issued date. The OAuth system has auto-renewal (although I’ve not confirmed this yet) so when your AccessToken expires, it gets a new one without you needing to do this.

My code for the MemoryDataStore is as follows:

   1: using Google.Apis.Auth.OAuth2.Responses;

   2: using Google.Apis.Util.Store;

   3: using System;

   4: using System.Collections.Generic;

   5: using System.Linq;

   6: using System.Text;

   7: using System.Threading.Tasks;

   8:  

   9: namespace Anvil.Services.FileStorageService.GoogleDrive

  10: {

  11:     /// <summary>

  12:     /// Handles internal token storage, bypassing filesystem

  13:     /// </summary>

  14:     internal class MemoryDataStore : IDataStore

  15:     {

  16:         private Dictionary<string, TokenResponse> _store;

  17:  

  18:         public MemoryDataStore()

  19:         {

  20:             _store = new Dictionary<string, TokenResponse>();

  21:         }

  22:  

  23:         public MemoryDataStore(string key, string refreshToken)

  24:         {

  25:             if (string.IsNullOrEmpty(key))

  26:                 throw new ArgumentNullException("key");

  27:             if (string.IsNullOrEmpty(refreshToken))

  28:                 throw new ArgumentNullException("refreshToken");

  29:  

  30:             _store = new Dictionary<string, TokenResponse>();

  31:  

  32:             // add new entry

  33:             StoreAsync<TokenResponse>(key,

  34:                 new TokenResponse() { RefreshToken = refreshToken, TokenType = "Bearer" }).Wait();

  35:         }

  36:  

  37:         /// <summary>

  38:         /// Remove all items

  39:         /// </summary>

  40:         /// <returns></returns>

  41:         public async Task ClearAsync()

  42:         {

  43:             await Task.Run(() =>

  44:             {

  45:                 _store.Clear();

  46:             });

  47:         }

  48:  

  49:         /// <summary>

  50:         /// Remove single entry

  51:         /// </summary>

  52:         /// <typeparam name="T"></typeparam>

  53:         /// <param name="key"></param>

  54:         /// <returns></returns>

  55:         public async Task DeleteAsync<T>(string key)

  56:         {

  57:             await Task.Run(() =>

  58:             {

  59:                 // check type

  60:                 AssertCorrectType<T>();

  61:  

  62:                 if (_store.ContainsKey(key))

  63:                     _store.Remove(key);

  64:             });

  65:         }

  66:  

  67:         /// <summary>

  68:         /// Obtain object

  69:         /// </summary>

  70:         /// <typeparam name="T"></typeparam>

  71:         /// <param name="key"></param>

  72:         /// <returns></returns>

  73:         public async Task<T> GetAsync<T>(string key)

  74:         {

  75:             // check type

  76:             AssertCorrectType<T>();

  77:  

  78:             if (_store.ContainsKey(key))

  79:                 return await Task.Run(() => { return (T)(object)_store[key]; });

  80:  

  81:             // key not found

  82:             return default(T);

  83:         }

  84:  

  85:         /// <summary>

  86:         /// Add/update value for key/value

  87:         /// </summary>

  88:         /// <typeparam name="T"></typeparam>

  89:         /// <param name="key"></param>

  90:         /// <param name="value"></param>

  91:         /// <returns></returns>

  92:         public Task StoreAsync<T>(string key, T value)

  93:         {

  94:             return Task.Run(() =>

  95:             {

  96:                 if (_store.ContainsKey(key))

  97:                     _store[key] = (TokenResponse)(object)value;

  98:                 else

  99:                     _store.Add(key, (TokenResponse)(object)value);

 100:             });

 101:         }

 102:  

 103:         /// <summary>

 104:         /// Validate we can store this type

 105:         /// </summary>

 106:         /// <typeparam name="T"></typeparam>

 107:         private void AssertCorrectType<T>()

 108:         {

 109:             if (typeof(T) != typeof(TokenResponse))

 110:                 throw new NotImplementedException(typeof(T).ToString());

 111:         }

 112:     }

 113: }

This sample uses the following Nuget package versions:

   1: <package id="Google.Apis" version="1.8.2" targetFramework="net45" />

   2: <package id="Google.Apis.Auth" version="1.8.2" targetFramework="net45" />

   3: <package id="Google.Apis.Core" version="1.8.2" targetFramework="net45" />

   4: <package id="Google.Apis.Drive.v2" version="1.8.1.1270" targetFramework="net45" />

   5: <package id="log4net" version="2.0.3" targetFramework="net45" />

   6: <package id="Microsoft.Bcl" version="1.1.9" targetFramework="net45" />

   7: <package id="Microsoft.Bcl.Async" version="1.0.168" targetFramework="net45" />

   8: <package id="Microsoft.Bcl.Build" version="1.0.14" targetFramework="net45" />

   9: <package id="Microsoft.Net.Http" version="2.2.22" targetFramework="net45" />

  10: <package id="Newtonsoft.Json" version="6.0.3" targetFramework="net45" />

  11: <package id="Zlib.Portable" version="1.9.2" targetFramework="net45" />

Using Google Drive API with C# – Part 1

We had a requirement to store a large volume of user files (for call recordings) as part of a new service. Initially it would be a few gigabytes of MP3 files, but if successful would possibly be into the terabyte range. Although our main database server has some space available, we didn’t want to store these on the database.

Storing them as files on the server was an option, but it would then mean we had to put in place a backup strategy. We would also need to spend a lot of money on new disks, or new NAS devices, etc. It started to look complicated and expensive.

It was then the little “cloud” lightbulb lit up, and we thought about storing the files on a cloud service instead. I have stuff on Dropbox, LiveDrive SkyDrive OneDrive and a Google Drive. However the recent price drop on Google Drive meant this was the clear favourite for storing our files. At $120 per year for 1TB of space that’s a no-brainer.

Google API

To do this we’d need to have the server listing, reading and writing files directly to the Google Drive. To do this we needed to use the Google Drive API.

I decided to write this series of articles because I found a lot of the help and examples on the web were confusing and in many cases out-of-date: Google has refactored a lot of the .NET client API and a lot of online sample code (including some in the API documentation) is for older versions and all the namespaces, classes and methods have changed.

API Access

To use the Google APIs you need a Google account, a Google drive (which is created by default for each user, and has 30GB of free storage), and API access.

Since you can get a free account with 30GB you can have one account for development and testing, and kept separate from the live account. You may want to use different browsers to set up the live and development/testing accounts. Google is very slick at auto-logging you in and then joining together multiple Google identities. For regular users this is great, but when trying to keep the different environments apart it’s a problem.

User or Service Account?

When you use the Google Drive on the web you’re using a normal user account. However, you may spot that there is also a service account option.

It seems logical that you might want to use this for a back-end service, but I’d recommend against using this for two reasons:

Creating a Project

I’ll assume you’ve already got a Google Account: if not you should set one up. I created a new account with it’s own empty drive so that I could use this in my unit test code.

Before you can start to write code you need to configure your account for API access. You need to create a project in the developer’s console. Click create project and give it name and ID. Click the project link once it’s created. You should see a welcome screen.

APIs

On the menu on the left we need to select APIs & Auth – this lets you determine which APIs your project is allowed to use.

A number of these will have been preselected, but you can ignore these if you wish. Scroll down to Drive API and Drive SDK. The library will be using the API but it seems to also need the SDK (enlighten me please if this is not the case!) so select both. As I understand it, the SDK is needed if you’re going to create online apps (like Docs or Spreadsheet), rather than accessing a drive itself. The usual legal popups will need to be agreed to.

The two entries will be at the top of the page, with a green ON button, and a configuration icon next to each

image

Configuration is a bit.. broken at present. Clicking either goes to configuration for the SDK on an older page layout. I don’t know if the SDK configuration is required or not. You could try accessing without it.

Credentials

The next step is to set up credentials. These are the identity of your login and there are different clientIDs based on the type of client you want to run.

By default you will have Client IDs set up for Compute Engine and Client ID for web application. To access drive from non-web code you need a Native Application, so click Create New Client ID. Select Installed application type and for C# and other .NET apps, select Other.

When this has completed you’ll have a new ClientID and a ClientSecret. Think of this as a username and password that you use to access the drive API. You should treat the Client Secret in the same way as a password and not disclose it. You might also want to store it in encrypted form in your application.

next: Part 2 – Authorising Drive API

Getting Rid of k__BackingField in Serialization

We have an application that uses WebApi to send out results for some queries. This has worked well and outputs nice JSON results courtesy of JSON.NET (thanks to James for that great library!).

Today I ran into a problem: the serialized JSON was corrupted with content that looks like this:

   1: {

   2:     "<Data>k__BackingField" : [{

   3:             "item1",

   4:             "item2"

   5:         }

   6:     ],

   7:     "<Totals>k__BackingField" : null,

   8:     "_count" : 2,

   9:     "_pageSize" : 10,

  10:     "_page" : 1,

  11:     "<Sort>k__BackingField" : "Date"

  12: }

My reaction was puzzlement: why on earth would a straightforward class with properies like Data and Count suddenly start spitting out weird JSON like this?

SO to the Rescue?

Obviously the first port of call was a search on StackOverflow

From this article we get some clues: the k__BackingField is created by automatic properties in C#, and that DataContractJsonSerializer does this.

But we’re not supposed to be using DataContractJsonSerializer, we’ve got WebApi which uses JSON.NET?

Solution

Turns out the cause is the SerializableAttribute – because I’d added that to the class, the object result from the WebAPI method got passed to DataContractJsonSerializer.

I had not seen this before because most of the results I had output didn’t have this attribute, even though the base class did. I removed this, and bingo, the results were fixed:

   1: {

   2:     "Data" : [{

   3:         "item1",

   4:         "item2"

   5:         }

   6:     ],

   7:     "Totals" : null,

   8:     "Count" : 2,

   9:     "PageSize" : 10,

  10:     "Page" : 1,

  11:     "Sort" : "Date"

  12: }

Raspberry Pi Wallboard System

One of the directors wanted to have a wallboard displaying real-time numbers from our new VoIP phone system. We had a web page which could show the stats, so we now had to decide how to get these onto a wall-mounted display in the office.

The display part was easy, there are quite a few 32 inch or larger LCD TV systems with HDMI input. The question was what to use to display and update the web page.

At first we considered setting up a PC to do this but even the Intel NUC devices are quite expensive – £250-plus for a device and a disk. They are also much more powerful than we need.

My colleague working on this project is looking at the Google ChromeCast device, but this is designed for media streaming rather than web pages. I decided to explore the Raspberry Pi as an alternative.

Toys!

To be honest, I’d been itching to mess about with a Pi since they came out. But with so much else to do I couldn’t justify the time to myself. This was a good opportunity to experiment with a specific, worthwhile goal in mind.

model_a_1_of_4_grande

I chose Pimoroni as my supplier as they had a good selection of starter kits. Our “production” unit would consist of a Pi model B, a case, 8GB SD card, WiFi dongle, 5v USB power adapter and a short HDMI cable.

This comes to £67 including VAT in the UK – a lot less than the NUC option. Add that to a 32” Samsung TV for about £219 including VAT. These are excellent as they also have a powered USB 5V connector – so the Pi runs off the TV power supply.

So a wallboard system for less than £300! A wall mounting bracket is extra – these vary from £10 upward, so we might just break the £300 limit for that.

I got two “production” units and a “Deluxe Raspberry Pi Starter Kit” which includes a simple USB keyboard, mouse, USB hub – this one was to act as our development box.

Configuration and Setup

The SD cards come pre-installed with NOOBS so I selected Raspbian and got to a working desktop. After configuring the WiFi we had network access.

The main requirement was a hands-free boot-to-display operation. Fortunately someone else had done the heavy lifting for this part of the design by configuring their Pi to act as a wall mounted outlook calendar. A tip of the hat to Piney for his excellent guide.

Once I had a working development system, I purchased a USB card reader (that supports SD card format – almost all do) for my PC and installed Win32 Disk Imager. I copied the working SD card from the development Pi to an image, and then wrote this image back to the two production SD cards.

Testing

I had so far had this on my office WiFi on a computer monitor, so I unhooked the development setup, and went into my house, where the children’s 42” TV sat in their den, practically begging me to try it out.

PiTV

I was impressed that I didn’t need to touch the screen setup for the HDMI to work correctly. I had to reconfigure the WiFi, but once that was done I could plug the Pi directly into the TV’s powered USB connector, and the HDMI cable. 

Installation

Installation at site isn’t totally shrink-wrap unless you know the WiFi configuration in advance. Our production Pis were delivered to my office and our excellent support tech Cristian used a USB mouse and keyboard to configure them with the correct WiFi setup and key. He then mounted the two Pis behind the monitors (you could use Velcro tape for this), connected their USB power to the monitor USB output and the HDMI to the TV’s HDMI.

Operation

The TV is switched on in the morning, which powers up the USB port. The Pi boots up directly into a full-screen display of the web page that shows our call stats.

PiTV

String.Join

Are you a .NET developer? Got a list of strings you want to join? This is what I and almost every other developer I’ve seen does:

var values = new List<string>();
// add some values...
string csv = string.Join(",", values.ToArray());

Turns out someone in the .NET framework team thought this was a bit dumb, so they quietly added a new overload in version 4.0 of the framework. This overload takes an IEnumerable<string> so now you can write:

var values = new List<string>();
// add some values...
string csv = string.Join(",", values);

Just thought I’d blog that in case you’re doing the same thing!

ASP.NET MVC attribute routing

As we start to add more pages to our ASP.NET MVC section of our application, I’ve found that the MVC routing table in version 4 is somewhat constraining. I’m not alone, it seems others find it awkward in doing more intelligent handling of routes.

Problem

Our site has customers, and we have different services for these customers. I’ve partitioned everything customer-related into it’s own area, so that the base URL for it is /Customer/

We use integer account ID’s from the database as our primary key, so logically if I want to refer to a specific customer I prefer the URL

/Customer/123

as our root. If we followed the standard MVC default, which would be

/Customer/Home/Index/123

Ugh. That just sounds long-winded and over-complicated.

So for example, the home page should be

/Customer/123/Home

The default ASP.NET route won’t work for this of course: /Customer/{controller}/{action}/{id} will interpret this as a controller called 123 and an action Home, with no ID. Easy enough to change the routing as we have until now:

/Customer/{customerID}/{controller}/{action}

First problem with this approach is that customerID is now a required value: what if I want to create a search page, to find a customer? I don’t have a customerID in this context, but it’s still customer related. What I’d like is a URL like

/Customer/Search

While this is possible in the MVC4 routing engine, it leads to a longer and longer set of routes to be registered in our RegisterRoutes method. What we actually want to specific is some kind of pattern matching a la regex, e.g.

/Customer/{CustomerID:\d+}/{controller}/{action}
/Customer/{controller:[^\d*]}/{action}

Attribute Based Routing

Alas the current MVC4 routing engine does not support this. However there is an alternative that it seems the ASP.NET team is adopting to appear in MVC 5: attribute based routing(ABR).

Installing is a breeze: Install the Nuget package it adds a setup file to the App_Start folder which loads the configuration option. That’s it.

Each controller/action can then decorated with attributes which define the routing. Using my example above, all my controllers live in the Customer area. However, I generally want to prefix each route/action with the customerID. In ABR, I can define the area and a prefix at the controller level:

    [RouteArea("Customer")]
    [RoutePrefix("{CustomerID:int}/Issue")]
    public class IssueController : Controller

In the above sample, the URL

~/Customer/{CustomerID}/Issue

is now the base URL for all actions on this controller. ABR will extract and parse the customer ID as an integer from the URL, and I can use it directly in my action methods, e.g.

        [GET("")]
        [GET("List")]
        public ActionResult List(int CustomerID)
        {
            return View();
        }

The List action works with a blank or “List” URL part, so either of the following routes will map to it:

~/Customer/{CustomerID}/Issue

~/Customer/{CustomerID}/Issue/List

No More IDs

When I refer to a specific Issue by ID, I can avoid the generic ‘{ID}’ we get in the old routing engine:

        // GET: /Customer/{CustomerID}/Issue/{IssueID}
        [GET("{IssueID:int}")]
        public ActionResult Index(int CustomerID, int IssueID)
        {

Now let’s say I want my search page, which does not have a customer ID:

~/Customer/Search

We can define a Search controller by dropping the CustomerID part:

    [RouteArea("Customer")]
    [RoutePrefix("Search")]
    public class SearchController : Controller
    {

This will map to the URL

~/Customer/Search

I won’t go into the ABR specification and all the options it provides, as the library is well documented and logical.

A big thanks to Tim McCall for his work!

Async File Uploads with MVC, WebAPI and Bootstrap

This is a ‘how-to’ aide-memoire on my research on file uploading within MVC/client applications.

Our application has a form with a couple of fields and we want to allow the user to upload a file as part of the form submission. Uploading a file in the old WebForm days was pretty simple. But now we want asynchronous uploads and send via WebAPI, so we need to handle things better.

My requirements are as follows:

  1. We don’t want a traditional post-and-redirect model. It must use an async upload method
  2. We need the whole form (file+form fields) in one go: file-only uploads are of no use in this case
  3. We might want KnockoutJS integration if appropriate..
  4. We don’t want the uploaded data stored in files on the webserver: we want memory streams written to our database object
  5. Will be on a Bootstrap page so ideally needs to blend in (although Bootstrap 2.3 does not itself render these controls)

Server-Side

Initial Investigation

There are two parts to the operation: server-side and client-side.

A bit of Googling for the server-side gets us to a blog post by Henrik Nielsen (from 2012):

Asynchronous File Upload using ASP.NET Web API. This ticks two of our boxes:  first it uses WebAPI to handle the post, and secondly it does so asynchronously. It’s not Knockout-bound but that’s not such a big issue at this stage. The example he provides runs as a console app (!) self-hosted web server, so it’s a bit.. interesting.

Except it won’t work. It’s an old beta-version sample with no complete version and it’s missing a lot of using directives, and.. the list goes on.

There are other versions of this around and most of them either don’t work or store the uploads to files, which is contrary to requirements, and not something I’d ever do. I needed something that used memory or streams.

Knockout

I also found a Knockout solution at Khayrov’s Github project. This was a great tool using Knockout to upload files on the client – and in theory then post onward to the server. The only problem was it used the FileAPI which won’t work on most older browsers. Strictly speaking KO isn’t needed for posting but it helps if the form has behaviours on it.

Back to WebAPI and Memory-only

Much more Googling and I found MultipartMemoryStreamProvider which reads the form data into memory. One issue here is it treats normal form values and files the same, so you have to differentiate. A quick Google suggests a solution. This looks like a much better approach, and uses async methods. I amended the code to make it easier to get the files out directly, by parsing the HttpContent list into a list of files. I have attached a source listing at the end of this article, along with a sample Post method that uses this.

Client Side

That seems to take care of the server side. The client side for testing was a standard html form and a submit method, which is not very async. I needed to use a jQuery .ajax call to post the form. Posting forms via AJAX with file uploads isn’t supported directly with .ajax, but after several experiments I settled on the jQuery.Form plugin. This seems to work very well on the versions I tested: IE8, IE10, Chrome v28, and Firefox v22.

I did have a couple of errors on Firefox but that was because I tried to upload a 22MB file as a test: IIS was set to accept the default maximum upload size of 4096K, which is only 4MB. Setting maxRequestLength to a higher value fixed this:

<configuration>

  <system.web>

    <httpRuntime maxRequestLength="32768" />

  </system.web>

</configuration>

The only thing the form plugin does not do well is handle errors: there seems to be no error code available in the .ajax model. We can handle an error event from the jQuery ajax call, but I wasn’t able to determine which error code was being returned.

Binding the Form Values to the Model

As we are processing the multi-part form ourselves, we are getting a list of file and a list of form values. This means we have to manually process the values. We could extract one-by-one using the name, but we should really use a Model Binder..

It does not seem to be possible to use the DefaultModelBinder from MVC as this takes controller contexts as the constructors, so I added a simple one to the provider. This uses a simple reflection-based name match and set operation.

Source

Source code of the amended WebAPI post and supporting classes:

using System;
using System.Collections.Generic;
using System.Collections.ObjectModel;
using System.Collections.Specialized;
using System.IO;
using System.Linq;
using System.Net;
using System.Net.Http;
using System.Net.Http.Headers;
using System.Threading.Tasks;
using System.Web.Http;
using System.Web.Mvc;

namespace MyWebApp.Api
{
    public class UploadController : ApiController
    {

        /// 
        /// Accept form post with files
        /// 
        /// 
        [System.Web.Mvc.HttpPost]
        public async Task Post()
        {
            if (!Request.Content.IsMimeMultipartContent("form-data"))
                throw new HttpResponseException(HttpStatusCode.BadRequest);

            var provider = await Request.Content.ReadAsMultipartAsync(new InMemoryMultipartFormDataStreamProvider());

            //access form data
            FormCollection formData = provider.FormData;

            //access files
            IList fileContentList = provider.Files;

            var fileDataList = provider.GetFiles();

            // get the files 
            var files = await fileDataList;

            // formulate the response
            if (files.Any())
                return string.Join("; ", 
                    (from f in files 
                     select string.Format("uploaded: {0} ({1} bytes = '{2}')", f.FileName, f.Size, f.ContentType)).ToArray());
            else
                return "No files attached";
        }


        public class InMemoryMultipartFormDataStreamProvider : MultipartStreamProvider
        {
            private FormCollection _formData = new FormCollection();
            private List _fileContents = new List();

            // Set of indexes of which HttpContents we designate as form data
            private Collection _isFormData = new Collection();

            /// 
            /// Gets a  of form data passed as part of the multipart form data.
            /// 
            public FormCollection FormData
            {
                get { return _formData; }
            }

            /// 
            /// Gets list of s which contain uploaded files as in-memory representation.
            /// 
            public List Files
            {
                get { return _fileContents; }
            }

            /// 
            /// Convert list of HttpContent items to FileData class task
            /// 
            /// 
            public async Task GetFiles()
            {
                return await Task.WhenAll(Files.Select(f => FileData.ReadFile(f)));
            }

            public override Stream GetStream(HttpContent parent, HttpContentHeaders headers)
            {
                // For form data, Content-Disposition header is a requirement
                ContentDispositionHeaderValue contentDisposition = headers.ContentDisposition;
                if (contentDisposition != null)
                {
                    // We will post process this as form data
                    _isFormData.Add(String.IsNullOrEmpty(contentDisposition.FileName));

                    return new MemoryStream();
                }

                // If no Content-Disposition header was present.
                throw new InvalidOperationException(string.Format("Did not find required '{0}' header field in MIME multipart body part..", "Content-Disposition"));
            }

            /// 
            /// Read the non-file contents as form data.
            /// 
            /// 
            public override async Task ExecutePostProcessingAsync()
            {
                // Find instances of non-file HttpContents and read them asynchronously
                // to get the string content and then add that as form data
                for (int index = 0; index < Contents.Count; index++)
                {
                    if (_isFormData[index])
                    {
                        HttpContent formContent = Contents[index];
                        // Extract name from Content-Disposition header. We know from earlier that the header is present.
                        ContentDispositionHeaderValue contentDisposition = formContent.Headers.ContentDisposition;
                        string formFieldName = UnquoteToken(contentDisposition.Name) ?? String.Empty;

                        // Read the contents as string data and add to form data
                        string formFieldValue = await formContent.ReadAsStringAsync();
                        FormData.Add(formFieldName, formFieldValue);
                    }
                    else
                    {
                        _fileContents.Add(Contents[index]);
                    }
                }
            }

            /// 
            /// Remove bounding quotes on a token if present
            /// 
            /// Token to unquote.
            /// Unquoted token.
            private static string UnquoteToken(string token)
            {
                if (String.IsNullOrWhiteSpace(token))
                {
                    return token;
                }

                if (token.StartsWith("\"", StringComparison.Ordinal) && token.EndsWith("\"", StringComparison.Ordinal) && token.Length > 1)
                {
                    return token.Substring(1, token.Length - 2);
                }

                return token;
            }
        }

        /// 
        /// Class to store attached file info
        /// 
        public class FileData
        {
            public string FileName { get; set; }
            public string ContentType { get; set; }
            public byte[] Data { get; set; }

            public long Size { get { return (Data != null ? Data.LongLength : 0L); } }

            /// 
            /// Create a FileData from HttpContent 
            /// 
            /// 
            /// 
            public static async Task ReadFile(HttpContent file)
            {
                var data = await file.ReadAsByteArrayAsync();
                var result = new FileData()
                {
                    FileName = FixFilename(file.Headers.ContentDisposition.FileName),
                    ContentType = file.Headers.ContentType.ToString(),
                    Data = data
                };
                return result;
            }

            /// 
            /// Amend filenames to remove surrounding quotes and remove path from IE
            /// 
            /// 
            /// 
            private static string FixFilename(string original)
            {
                var result = original.Trim();
                // remove leading and trailing quotes
                if (result.StartsWith("\""))
                    result = result.TrimStart('"').TrimEnd('"');
                // remove full path versions
                if(result.Contains("\\"))
                    // parse out path
                    result = new System.IO.FileInfo(result).Name;

                return result;
            }
        }

    
    }
}